Git「开发日志」

持续记录使用Git开发过程中常用命令/常见问题等等..

一般来说,日常使用只要记住下图6个命令,就可以了。但是熟练使用,恐怕要记住60~100个命令。
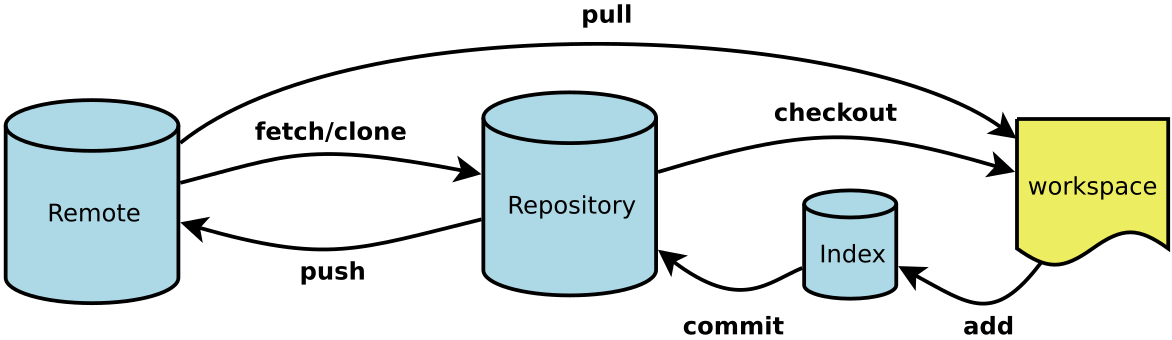
Git 流

  • Workspace:工作区
  • Index / Stage:暂存区
  • Repository:仓库区(或本地仓库)
  • Remote:远程仓库

Git常用命令清单

新建代码库

1
2
3
4
5
6
7
8
# 在当前目录新建一个Git代码库
git init

# 新建一个目录,将其初始化为Git代码库
git init [project-name]

# 下载一个项目和它的整个代码历史
git clone [url]

配置

Git的设置文件为 .gitconfig,它可以在用户主目录下(全局配置),也可以在项目目录下(项目配置)

1
2
3
4
5
6
7
8
9
# 显示当前的Git配置
git config --list

# 编辑Git配置文件
git config -e [--global]

# 设置提交代码时的用户信息
git config [--global] user.name "[name]"
git config [--global] user.email "[email address]"

增加/删除文件

1
2
3
4
5
6
7
8
9
10
11
12
13
14
15
16
17
18
19
20
21
# 添加指定文件到暂存区
git add [file1] [file2] ...

# 添加指定目录到暂存区,包括子目录
git add [dir]

# 添加当前目录的所有文件到暂存区
git add .

# 添加每个变化前,都会要求确认
# 对于同一个文件的多处变化,可以实现分次提交
git add -p

# 删除工作区文件,并且将这次删除放入暂存区
git rm [file1] [file2] ...

# 停止追踪指定文件,但该文件会保留在工作区
git rm --cached [file]

# 改名文件,并且将这个改名放入暂存区
git mv [file-original] [file-renamed]

代码提交

1
2
3
4
5
6
7
8
9
10
11
12
13
14
15
16
17
18
# 提交暂存区到仓库区
git commit -m [message]

# 提交暂存区的指定文件到仓库区
git commit [file1] [file2] ... -m [message]

# 提交工作区自上次commit之后的变化,直接到仓库区
git commit -a

# 提交时显示所有diff信息
git commit -v

# 使用一次新的commit,替代上一次提交
# 如果代码没有任何新变化,则用来改写上一次commit的提交信息
git commit --amend -m [message]

# 重做上一次commit,并包括指定文件的新变化
git commit --amend [file1] [file2] ...

分支

1
2
3
4
5
6
7
8
9
10
11
12
13
14
15
16
17
18
19
20
21
22
23
24
25
26
27
28
29
30
31
32
33
34
35
36
37
38
39
40
41
42
# 列出所有本地分支
git branch

# 列出所有远程分支
git branch -r

# 列出所有本地分支和远程分支
git branch -a

# 新建一个分支,但依然停留在当前分支
git branch [branch-name]

# 新建一个分支,并切换到该分支
git checkout -b [branch]

# 新建一个分支,指向指定commit
git branch [branch] [commit]

# 新建一个分支,与指定的远程分支建立追踪关系
git branch --track [branch] [remote-branch]

# 切换到指定分支,并更新工作区
git checkout [branch-name]

# 切换到上一个分支
git checkout -

# 建立追踪关系,在现有分支与指定的远程分支之间
git branch --set-upstream [branch] [remote-branch]

# 合并指定分支到当前分支
git merge [branch]

# 选择一个commit,合并进当前分支
git cherry-pick [commit]

# 删除分支
git branch -d [branch-name]

# 删除远程分支
git push origin --delete [branch-name]
git branch -dr [remote/branch]

标签

1
2
3
4
5
6
7
8
9
10
11
12
13
14
15
16
17
18
19
20
21
22
23
24
25
26
# 列出所有tag
git tag

# 新建一个tag在当前commit
git tag [tag]

# 新建一个tag在指定commit
git tag [tag] [commit]

# 删除本地tag
git tag -d [tag]

# 删除远程tag
git push origin :refs/tags/[tagName]

# 查看tag信息
git show [tag]

# 提交指定tag
git push [remote] [tag]

# 提交所有tag
git push [remote] --tags

# 新建一个分支,指向某个tag
git checkout -b [branch] [tag]

查看信息

1
2
3
4
5
6
7
8
9
10
11
12
13
14
15
16
17
18
19
20
21
22
23
24
25
26
27
28
29
30
31
32
33
34
35
36
37
38
39
40
41
42
43
44
45
46
47
48
49
50
51
52
53
54
55
56
57
58
59
60
# 显示有变更的文件
git status

# 显示当前分支的版本历史
git log

# 显示commit历史,以及每次commit发生变更的文件
git log --stat

# 搜索提交历史,根据关键词
git log -S [keyword]

# 显示某个commit之后的所有变动,每个commit占据一行
git log [tag] HEAD --pretty=format:%s

# 显示某个commit之后的所有变动,其"提交说明"必须符合搜索条件
git log [tag] HEAD --grep feature

# 显示某个文件的版本历史,包括文件改名
git log --follow [file]
git whatchanged [file]

# 显示指定文件相关的每一次diff
git log -p [file]

# 显示过去5次提交
git log -5 --pretty --oneline

# 显示所有提交过的用户,按提交次数排序
git shortlog -sn

# 显示指定文件是什么人在什么时间修改过
git blame [file]

# 显示暂存区和工作区的差异
git diff

# 显示暂存区和上一个commit的差异
git diff --cached [file]

# 显示工作区与当前分支最新commit之间的差异
git diff HEAD

# 显示两次提交之间的差异
git diff [first-branch]...[second-branch]

# 显示今天你写了多少行代码
git diff --shortstat "@{0 day ago}"

# 显示某次提交的元数据和内容变化
git show [commit]

# 显示某次提交发生变化的文件
git show --name-only [commit]

# 显示某次提交时,某个文件的内容
git show [commit]:[filename]

# 显示当前分支的最近几次提交
git reflog

远程同步

1
2
3
4
5
6
7
8
9
10
11
12
13
14
15
16
17
18
19
20
21
22
23
# 下载远程仓库的所有变动
git fetch [remote]

# 显示所有远程仓库
git remote -v

# 显示某个远程仓库的信息
git remote show [remote]

# 增加一个新的远程仓库,并命名
git remote add [shortname] [url]

# 取回远程仓库的变化,并与本地分支合并
git pull [remote] [branch]

# 上传本地指定分支到远程仓库
git push [remote] [branch]

# 强行推送当前分支到远程仓库,即使有冲突
git push [remote] --force

# 推送所有分支到远程仓库
git push [remote] --all

撤销

1
2
3
4
5
6
7
8
9
10
11
12
13
14
15
16
17
18
19
20
21
22
23
24
25
26
27
28
29
30
31
# 恢复暂存区的指定文件到工作区
git checkout [file]

# 恢复某个commit的指定文件到暂存区和工作区
git checkout [commit] [file]

# 恢复暂存区的所有文件到工作区
git checkout .

# 重置暂存区的指定文件,与上一次commit保持一致,但工作区不变
git reset [file]

# 重置暂存区与工作区,与上一次commit保持一致
git reset --hard

# 重置当前分支的指针为指定commit,同时重置暂存区,但工作区不变
git reset [commit]

# 重置当前分支的HEAD为指定commit,同时重置暂存区和工作区,与指定commit一致
git reset --hard [commit]

# 重置当前HEAD为指定commit,但保持暂存区和工作区不变
git reset --keep [commit]

# 新建一个commit,用来撤销指定commit
# 后者的所有变化都将被前者抵消,并且应用到当前分支
git revert [commit]

# 暂时将未提交的变化移除,稍后再移入
git stash
git stash pop

其他

1
2
# 生成一个可供发布的压缩包
git archive

Git 设置

邮箱和密码

1
2
3
git config --global user.email "code0809@163.com"

git config --global user.name "SoulMate94"

需要注意的是,如果以前全局配置后,再次执行该操作会覆盖原用户名。

如果配置了全局账号,多个 Git 账号的情况下执行 remote、pull、push 的时候会出现问题,因为要 pull 的时候识别的是邮箱,多个 git 账号,必然对应多个邮箱,那自然就不能使用 global 的 user.email 了。

这时候可以为每个 repo 设置自己的 user.email。

1
2
3
4
5
6
7
# 取消 global
git config --global --unset user.name
git config --global --unset user.email

# 设置每个项目 repo 的 user.email
git config user.email "xxx@xxx.com"
git config user.name "username"

SSH key

1
ssh-keygen -t rsa -C "code0809@163.com"

一直回车,成功的话会在 ~/ 下生成 .ssh 文件夹,进去,打开 id_rsa.pub,复制里面的 key,然后进入 GitHub 的 Account Settings,选择 SSH Keys -> Add SSH Key,粘贴在你电脑上生成的 key。(title 随便填)

验证是否成功:

1
2
3
4
$ ssh -T git@github.com

成功:
Hi tianqixin! You've successfully authenticated, but GitHub does not provide shell access.

配置多个 Git 远程仓库的 SSH-Key

我机器上的 Git 会在 GitHub、GitCafe、Coding.NET 、以及树莓派上的私有 Git 仓库之间来回切换,所以如果不配置 SSH-Key 光输入密码就得浪费不少时间。

在默认情况下,ssh 总是使用 id_rsa 密钥文件进行链接,即是第一次执行 ssh-keygen 后默认生成的,这样对于多个账号的认证肯定是不行的。

因此,要实现多帐号下的 SSH Key 的切换需要在客户端做一些配置:

1
2
3
4
5
cd ~/.ssh    # 必须进入这个路径否则生成的密钥路径容易遗忘
ssh-keygen -t rsa -C 'username@github.com' -f id_rsa_github # -C 后面跟的是注释
ssh-keygen -t rsa -C 'username@gitcafe.com' -f id_rsa_gitcafe
ssh-keygen -t rsa -C 'username@coding.net' -f id_rsa_coding
# 如果还有多个 Git 远程仓库地址就继续执行 ...

然后复制 ~/.ssh/ 下面的相应的公钥到你的 Git 远程仓库服务器上即可,这个步骤和 GitHub 上的操作是一样的。

然后在 ~/.ssh/ 下面创建一个 config 文件,填入你刚刚配置的 SSH 密钥信息,内容应类似于如下:

1
2
3
4
5
6
7
8
9
10
11
12
13
14
15
16
17
Host github.com
HostName github.com
User SoulMate94
Port 22
IdentityFile ~/.ssh/id_rsa_github

Host gitcafe.com
HostName gitcafe.com
User SoulMate94
Port 22
IdentityFile ~/.ssh/id_rsa_gitcafe

Host git.coding.net # 注意 Coding.NET 的 HostName 是 git.coding.net
HostName git.coding.net
User SoulMate94
Port 22
IdentityFile ~/.ssh/id_rsa_coding

然后可以测试一下是否配置 OK:

1
2
3
4
ssh -T git@github.com
ssh -T git@gitcafe.com
ssh -T git@git.coding.net
ssh -T git@git.keensword.net

如果没有提示错误就说明 SSH 配置好了。

然后克隆 SSH 协议的 Git 仓库即可,此后便不用每次输入用户名密码了,比如:

1
2
git clone git@gitcafe.com:SoulMate94/soulmate94.git
git clone git@git.coding.net:SoulMate94/SoulMate94.git

然后还可以为不同远程 Git 仓库起不同的别名,就算是为同一内容的不同 Git 仓库提交代码,也可以通过别名来区分,比如:

1
2
git remote add gitcafe git@gitcafe.com:SoulMate94/soulmate94.git
git remote add coding git@git.coding.net:SoulMate94/SoulMate94.git

这样修改了同一个仓库后就算已经 push 到了一个远程仓库地址,也可以继续 push 到另一个的同一分支或不同分支,其区别就是别名:

1
2
git push gitcafe master
git push coding master

注意

只有克隆 SSH 协议的 Git 仓库才能使 SSH 密钥机制生效,如果克隆的是 HTTPS 协议的则每次依然需要输入用户名和密码。

GIT 分支操作

添加远程仓库地址和推送到远程仓库

1
2
3
git remote add origin git@github.com:SoulMate94/blog.git

git push -u origin master
  • origin 是为远程仓库地址起的别名。
  • -u 只在第一次推送时使用,作用是把本地的 master 分支和远程的 master 分支关联起来,之后的推送不再需要这个参数。

为远程仓库起别名

1
2
3
4
5
 移除现有分支别名
git remote rm origin

# 为远程仓库地址重新起别名
git remote add caoxl git@github.com:SoulMate94/SM94.git

创建分支

如果 clone 了一个空仓库,那么在执行 git branch master 的时候会报错:

fatal: Not a valid object name: ‘master’.

这时候只需添加一些文件 commit 就行了, 比如:

1
2
3
git add README.md
git commit -m "test"
git branch dev

切换分支

1
2
git checkout --orphan gh-pages
git checkout -b test # 从当前分支中分出一个 test 分支并切换到新 test 分支

查看分支

1
2
3
git branch -a    # 查看远程分支
git branch # 查看本地分支
git remote show origin

删除分支

1
2
3
4
5
git branch -d branch_name        # 删除本地分支
git push origin --delete <branch_name> # 删除远程分支版本( 类似的有删除标签:git push origin --delete tag <tagname> )
git push origin :<branchName> # 推送一个空分支到远程分支, 其实就相当于删除远程分支
git remote prune origin # 删除不存在对应远程分支的本地分支
git fetch -p #在 fetch 之后删除掉没有与远程分支对应的本地分支

重命名本地分支

1
git branch -m devel develop

Git 移除已经 add 的文件

1
git reset --hard  需要回退的那次 commit 的哈希值

每次 commit 的哈希值可以通过 git log 命令查看

上述命令执行成功之后,会彻底返回到回退到的版本状态,新发生的变更将会丢失。 对于部分发生了变更,但是变更部分的文件夹存在未提交的文件可能导致目录非空而删除失败,此时需要自行处置

完成之后,使用 –force-f 参数强制 push

1
2
3
4
git push origin HEAD --force
- `HEAD` 最近一个提交。

- `HEAD^` 上一次。

查看远程 Git 仓库

1
git remote -v

FAQ

为什么删不了 master 分支?

需要先更改默认分支为非 master 分支。再执行删除操作:

1
2
3
4
5
6
7
8
删除本地分支
git branch -d [branch-name]
git branch -D master

删除远程分支
git push origin :master
git push origin --delete [branch-name]
git branch -dr [remote/branch]

将 .gitignore.txt 修改为 .gitignore 时提示 “必须键入文件名” 怎么办?

1
rename .gitignore.txt .gitignore

Git忽略规则及 .gitignore 规则不生效的解决办法

已知在 git 中如果想忽略掉某个文件,不让这个文件提交到版本库中,可以使用修改根目录中 .gitignore 文件的方法(如无,则需自己手工建立此文件)。

这个文件每一行保存了一个匹配的规则例如:

1
2
3
4
5
6
# 此为注释 – 将被 Git 忽略
*.a # 忽略所有 .a 结尾的文件
!lib.a # 但 lib.a 除外
/TODO # 仅仅忽略项目根目录下的 TODO 文件,不包括 subdir/TODO
build/ # 忽略 build/ 目录下的所有文件
doc/*.txt # 会忽略 doc/notes.txt 但不包括 doc/server/arch.txt

规则很简单,不做过多解释,但是有时候在项目开发过程中,突然心血来潮想把某些目录或文件加入忽略规则,按照上述方法定义后发现并未生效,原因是 .gitignore只能忽略那些原来没有被track的文件,如果某些文件已经被纳入了版本管理中,则修改 .gitignore 是无效的。那么解决方法就是先把本地缓存删除(改变成未track状态),然后再提交:

1
2
3
git rm -r --cached .
git add .
git commit -m 'update .gitignore'

如果 cache 暂存区的内容和 HEAD 不一致,请使用: git rm rf --cache . 强制删除

Git 停止追踪文件权限

1
2
git config core.filemode false
cat .git/config

.gitkeep 有什么用 ?

“.gitkeep” isn’t documented, because it’s not a feature of Git.

Git cannot add a completely empty directory. People who want to track empty directories in Git have created the convention of putting files called “.gitkeep” in these directories. The file could be called anything; Git assigns no special significance to this name.

There is a competing convention of adding a “.gitignore” file to the empty directories to get them tracked, but some people see this as confusing since the goal is to keep the empty directories, not ignore them; “.gitignore” is also used to list files that should be ignored by Git when looking for untracked files.

or you can use like this to except for this one: !.gitignore.

git fetch repo 和 git fetch repo branch 的区别 ?

git fetch, 理解 fetch 的含义, 是远程协作的关键,而理解 fetch 的关键, 是理解 FETCH_HEAD。

FETCH_HEAD 指的是: 某个 branch 在服务器上的最新状态

每一个执行过 fetch 操作的项目,都会存在一个 FETCH_HEAD 列表,这个列表保存在 .git/FETCH_HEAD 文件中, 其中每一行对应于远程服务器的一个分支。

当前分支指向的 FETCH_HEAD, 就是这个文件第一行对应的那个分支。

一般来说, 存在两种情况:

  • 如果没有显式的指定远程分支, 则远程分支的 master 将作为默认的 FETCH_HEAD。
  • .如果指定了远程分支, 就将这个远程分支作为 FETCH_HEAD。

常见的 git fetch 使用方式包含以下四种:

  • git fetch

    这一步其实是执行了两个关键操作:

    1.创建并更新所有远程分支的本地远程分支。

    2.设定当前分支的 FETCH_HEAD 为远程服务器的 master 分支 (上面说的第一种情况)。

    需要注意的是,和 push 不同, fetch 会自动获取远程 新加入的分支。

  • git fetch origin

同上, 只不过手动指定了 remote。

  • git fetch origin branch1

设定当前分支的 FETCH_HEAD 为远程服务器的 branch1 分支。

注意: 在这种情况下, 不会在本地创建本地远程分支, 这是因为:

这个操作是 git pull origin branch1 的第一步, 而对应的 pull 操作,并不会在本地创建新的 branch。

一个附加效果是:这个命令可以用来测试远程主机的远程分支 branch1 是否存在, 如果存在, 返回0, 如果不存在, 返回128, 抛出一个异常。

  • git fetch origin branch1:branch2

只要明白了上面的含义, 这个就很简单了:

1.首先执行上面的 fetch 操作
2.使用远程 branch1 分支在本地创建 branch2 (但不会切换到该分支),如果本地不存在branch2分支, 则会自动创建一个新的 branch2 分支。

如果本地存在 branch2 分支, 并且是 fast forward,则自动合并两个分支, 否则, 会阻止以上操作.

  • git fetch origin :branch2

等价于: git fetch origin master:branch2。

  • git pull

只要理解了 git fetch, git pull就太简单了。

git pull 等价于以下两步:

1.经命令中的pull换成fetch, 执行之。

2.git merge FETCH_HEAD

唯一需要提及的一点是:

我认为 pull 操作, 不应该涉及三方合并 或 衍合 操作。

换个说法: pull 应该总是 fast forward 的. 为了达到这样一个效果, 在真正 push 操作之前, 我倾向于使用衍合, 在本地对代码执行合并操作。

关于 git 不区分文件名大小写的处理

处理办法:

windows 下在 git 中修改文件的大小写

1
2
3
4
git mv --force myfile MyFile

# 或者
git mv -f myfile MyFile

然后 commit 就好了。当然也可以配置一下 git:

1
Add ignorecase = false to [core] in .git/config;

其他

  • 创建版本号为 1 的 master 分支
1
git push sina master:1
  • 删除 master 分支上版本号为 1 的 代码
1
2
3
4
git push sina :1

# 或
git push sina master :1

有空格则为删除版本,无空格则为新建版本。

1
git push origin :branch

表示将一个内容为空的同名分支推送到远程的分支,说白了, 即删除远程主机的 branch 分支, 但是这并不会消除之前的 comment 内容, 而且你一旦提交了一些大的文件(例如: 图片之类的), 通过这个操作, 是不会将这些文件占用的空间消除的. 如果要真正的删除一个文件, 除了删除整个项目, Github网站也有提供办法。

参考

Powered by Hexo and Hexo-theme-hiker

Copyright © 2017 - 2023 Keep It Simple And Stupid All Rights Reserved.

访客数 : | 访问量 :